
Whether you want to create a stunning piece of jewelry for a wedding, special occasion, or as a gift, this easy-to-follow DIY Guide shows how to design a DIY Vintage Pearl Necklace. A pearl necklace featuring a glamorous pendant is a timeless statement piece that will look stylish both today and for years to come.
DIY Vintage Pearl Necklace
The customary way to create a pearl necklace is to use a technique called pearl knotting. However, this tends to be time-consuming and laborious. The simpler method is to use loose pearls and soft-flex jewelry wire. Below are the tools you will need to create this DIY Necklace.
Tools
- Loose Pearls
- Crystal Brooch
- Soft Flex Jewelry Wire
- Crimp Beads & Clasp
- Jump Rings
- Pliers & Scissors
- Superglue
Instructions
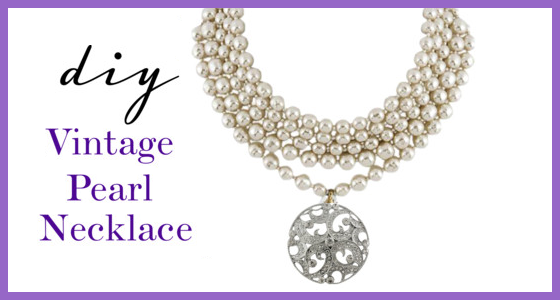
- Cut 5 pieces of the soft flex jewelry wire in multiple lengths. The shortest length should be long enough to comfortably fit around your neck (like a choker style necklace). Each additional strand should be appx. 1/2″ – 3/4″ longer, to form a multi-tiered, graduated effect (like the necklace pictured above).
- Attach one end of each jewelry wire (that you just cut) to a jump ring (all 5 wires should attach to the same jump ring), using pliers and a crimp bead on each wire (to securely fasten), by creating a small loop with the jewelry wire end, and crimping the crimp bead at the base of the loop. This ensures that the pearls stay on while stringing each strand.
- String loose pearls on each jewelry wire to create a strand of pearls. Leave appx. 1/4″ of exposed jewelry wire, so that you can easily secure the wire to the lobster claw. After stringing each wire with pearls, use the pliers to attach the lobster claw (clasp) and a crimp bead (to fasten), to the opposite end of the exposed jewelry wire, to secure the pearls on the strand(s). After all 5 strands have been attached to the jump ring and lobster claw (clasp), your multi-strand DIY Necklace is nearly finished.
- Superglue the metal pin on the backside of the crystal brooch closed. After it is fully-dry, attach a jump ring to one side of the (closed) pin. Then attach the jump ring to the longest strand of pearls (in the center), as a hanging pendant.
Voila! In just a few easy steps, you’ve created a gorgeous DIY Vintage Pearl Necklace.


I love this idea! I definitely want to give it a try
Hi Dora! It’s pretty simple to do, once you get the hang of crimping the beads and securing the lobster claw/jump ring. Enjoy!
I love DIY things and this looks like something that should keep me occupied! I look forward to seeing the finished product once I start it! inspirationcosmetics.com
For more DIY jewelry ideas and instructions, check out Michaels.com.